
Inside-Boot Card Holder
UNTESTED DRAFT — not physically prototyped. Paper-fit and scrap-test before wearing or making show pieces.
An original printable leather pattern for 1–2 cards · V1 untested
A small leather pocket with a U-shaped opening, a bottom thumb notch, an independent card keeper and an integral hanger for an existing boot pull tab. Download the true-size pattern, paper-fit it to your own boot, then make a scrap prototype before making a pair.
Open full-size concept illustration
Go to the method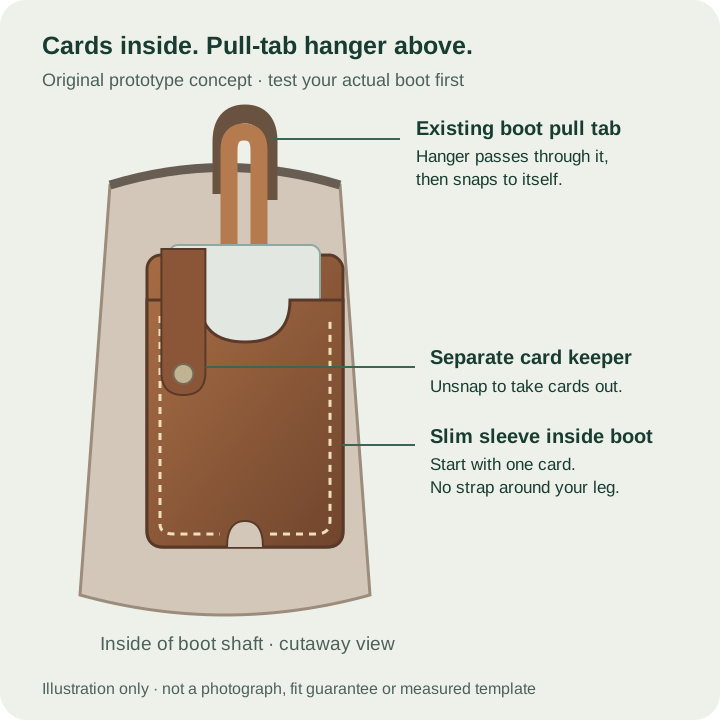
Print & make
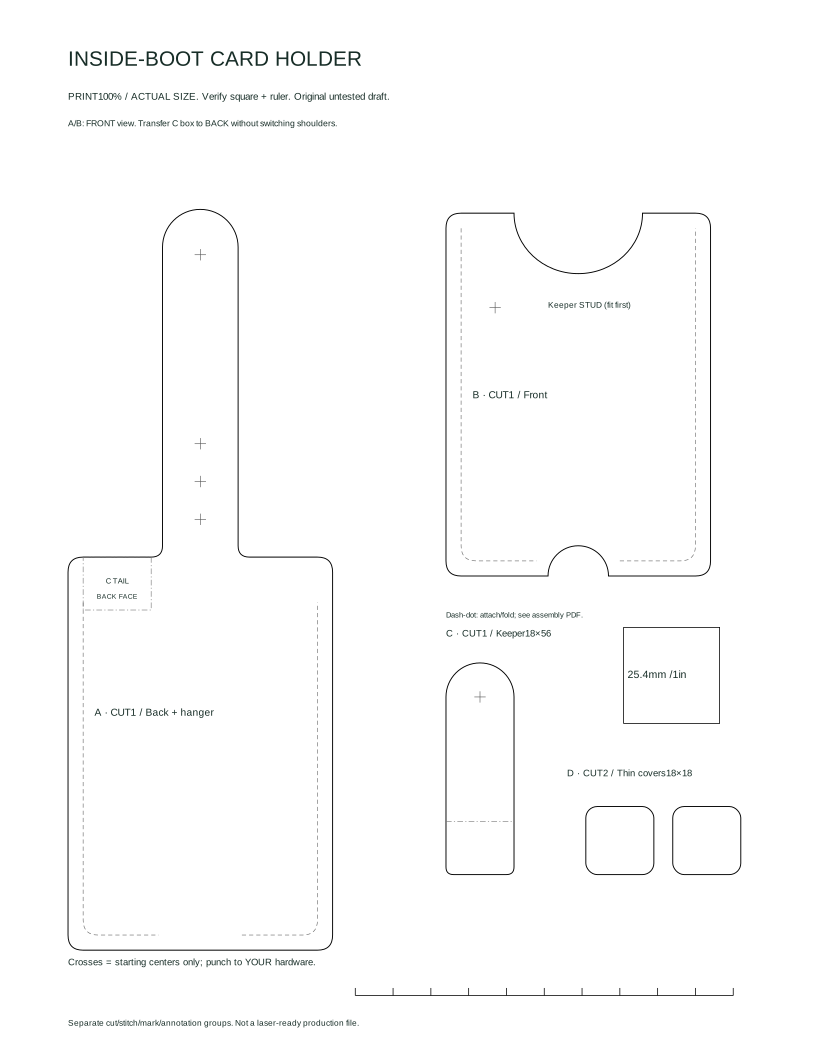
V1 untested draft. Print the Letter or A4 pattern at 100% / Actual Size, never Fit to Page. Measure the 25.4 mm square and 100 mm ruler before cutting. The assembly PDF and overview are instructions, not full-size cutting templates.
Cut list · per holder
- A — cut 1 back + integral hanger: 70 × 104 mm body, 20 mm-wide hanger extending 92 mm above the body; overall height 196 mm. The back stays solid.
- B — cut 1 front: 70 × 96 mm, top U-scoop 34 mm wide × 16 mm deep, bottom thumb notch radius 8 mm. Notches are front-only.
- C — cut 1 keeper: 18 × 56 mm with a 14 mm square-tail anchor and rounded free tip. Sew the anchor to the leg-facing back at x 4–22 / y 90–104 mm; fold at the body top y 104 mm.
- D — cut 2 smooth cap covers: 18 × 18 mm each, from thin soft leather or lining. Cover the front stud’s card-facing cap and hanger stud’s leg-facing cap, not working snap faces.
For a pair, double the cut quantities and use four complete snap sets total. Paper-fit and scrap-test one holder first.
The Method
Print and check the scale
Choose the one-page Letter or A4 pattern PDF. Print at 100% / Actual Size with Fit to Page disabled. Measure both the 25.4 mm calibration square and 100 mm ruler. Reprint if either is wrong. Keep the assembly sheets separate from the full-size cutting pattern; an SVG preview on a screen is not a scale check.
Paper-fit the boot and the card stack
Cut and fold a paper mockup. Check that the 20 mm hanger passes through an existing pull tab and that the pocket sits against the upper outer shaft, away from heel/ankle pressure. Try your actual 1–2-card stack as dummy cards. Do not proceed if the shaft squeezes it against your leg or the pull tab cannot carry it securely.
Cut once in scrap before your good leather
Cut A, B, C and two D covers to the cut list. Cut the U-scoop and bottom thumb notch in B only; A remains solid. The dashed 4 mm-inset lines are seam guides, not pre-matched stitch holes. Glue/clamp paired layers and mark or punch them together after assembly alignment.
Set and cover the front stud
Test the keeper against the whole card/leather stack. The proposed front stud is at x 13 / y 71 mm on B. Mark the fitted position, punch to the hardware manufacturer’s instructions and set the stud before closing the pocket. Smoothly cover its card-facing cap with one D cover; leave the working snap face accessible. Check the post is suitable for the complete stack.
Anchor the keeper on the back face
Before sewing the pocket closed, sew C’s 18 × 14 mm square-tail anchor to A’s LEG-FACING BACK, x 4–22 / y 90–104 mm. Coordinates show A and B from the FRONT: through-mark the box onto A’s BACK without switching physical shoulders. The tail bottom starts at body y 90 mm and the free end points UP. Fold over the FREE LEFT SHOULDER at body y 104 mm, clear of the integral hanger, so the rounded end later comes over the cards to B’s front stud. Keep it independent of the integral hanger.
Sew the front to the back
Align B with A at the bottom and sides. Sew the paired layers on the guide lines, leaving the marked bottom stitch gap x 24–46 mm open around the thumb notch. Do not bridge the open notch with stitches. Backstitch/secure ends appropriately and check the card opening and solid back are unobstructed.
Fit the hanger and set only one matching stud
Loop A’s hanger through the existing pull tab and back onto itself, without altering the boot. Its proposed tip socket center is x 35 / y 184 mm. Paper/scrap-fit the matching fixed stud before punching: y 114 mm is the proposed default, y 124 or 134 mm are alternatives, not three snaps to install. Select only ONE fitted stud position. Cover the fixed stud’s leg-facing cap with the second D cover.
Fit the keeper, finish and wear-test
With the dummy cards inserted, fold C over the FREE LEFT SHOULDER to the front stud and mark the matching socket through the real stack; its proposed local center is x 9 / y 47 mm. Set, then smooth edges and cap covers. Test the off-center keeper with dummy cards: shake and invert over a soft surface, checking neither card works past it. Also test removal through the bottom notch and security while sitting, bending, walking, dancing and removing the boot. Stop for rubbing, pressure, numbness, circulation discomfort or a loose tab. Only then consider making a pair; no physical test has been performed for this published draft.
Safety & Care
- Paper and scrap prototypes are required. This untested pattern does not establish comfort, boot compatibility, retention or durability.
- Use only an existing suitable pull tab; never cut or punch the boot and never tighten a strap around your leg. Avoid ankle/heel pressure and do not force cards inside a tight shaft.
- Stop wearing immediately for rubbing, pressure, numbness or circulation discomfort. Check attachment and card retention with dummy cards before trusting valuables; not guaranteed loss-proof.
- Cover metal backs facing cards or your leg with smooth, thin lining and smooth every edge. Do not cover working snap faces. Inspect for loose hardware, torn leather, sharp edges or sweat-softened adhesive before each wear.
- Test dye and finish for sweat transfer onto clothing, skin and boot lining. This is not waterproof storage; remove the holder if wet and follow the leather/finish care instructions.
- Follow tool and hardware manufacturer instructions. Work on a stable mat, keep cutting and punch paths clear, ventilate adhesives and allow the full labeled cure.
Troubleshooting
- The snap will not reach or the keeper strains
- Do not force it or add multiple studs. Revisit the paper/scrap mockup with the actual leather and card stack. Change your mockup before committing hardware; the proposed centers are not universal fitting positions.
- The boot feels tighter or the holder rubs
- Remove it immediately. Try less bulk only in a new mockup, and use the upper outer shaft away from pressure points. If there is no comfortable clearance or suitable pull tab, this design is not appropriate for that boot.
- Cards bind or catch on metal
- Check seam placement, card clearance and thin smooth cap covers. Do not trim the solid back into a thumb notch or leave exposed caps against cards. Rework and test in scrap rather than forcing cards.
- The bottom notch is sewn shut
- The front-only notch needs its marked x 24–46 mm bottom seam gap left open. Correct the scrap build; stitches must not bridge the open notch.
Ideas to Try
- Keep the first successful scrap prototype as a fit sample for the specific boot and card stack.
- Use an original, simple surface treatment only after the construction works. No Western ornament or creator motif is included or traced.
- Make the second holder only after testing the first; left and right boots may have different clearances.
Sources
User-supplied screenshot inspiration, original pattern. The screenshot names Rockin’ A L Western, but no verified public social URL or exact maker template was supplied. The reference screenshot is private and is not republished here. Hidden fastening and original maker dimensions are not claimed. All dimensions and assembly instructions here are our untested V1 design, not a reconstruction of the creator’s pattern.
Updated 2026-11-22