
Oreo-Inspired Magnetic Leather Fidget Coins
Adult use only. Powerful magnets are a fatal ingestion hazard—not a child-safe toy.
Dark leather, a cream-colored edge, and a magnet hidden inside each coin.
Make a pair of layered leather fidget coins with dark covers and a natural-tan center ring. An adult workshop guide to fitting the hidden magnets, checking polarity, and finishing the edges.
Go to the method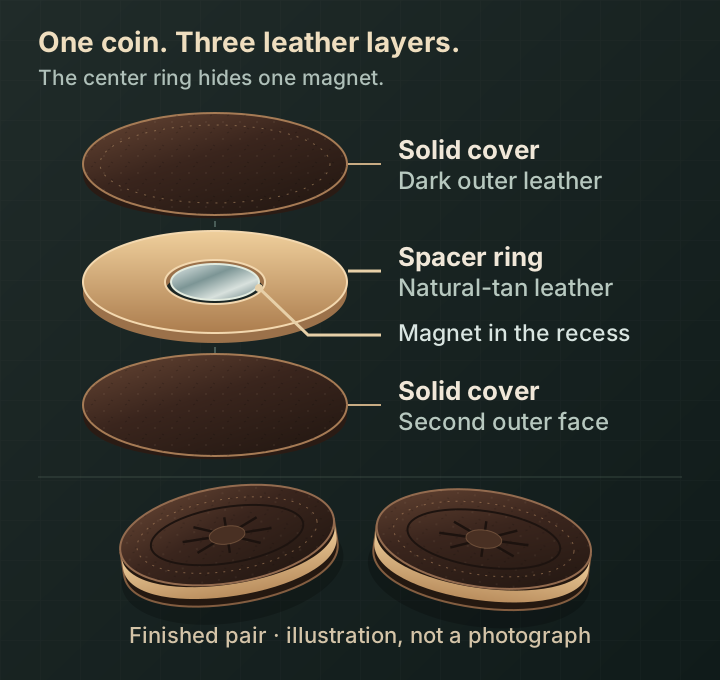
The Method
Fit the stack before choosing cutters
Begin with our untested 40 mm outer / 20 mm center / 20 × 3 mm magnet proposal, not a creator-exact pattern. Measure the actual magnets and dry-fit the 20 mm holes without forcing them. Place one magnet in each nominal 3 mm ring with the adhesive allowance, then test both complete stacks with thin covers. Thicker covers can weaken attraction; thin covers must still resist wear. Adjust the spacer, cover thickness, or hole fit before bonding so neither face bulges and the magnet cannot move. No pull force or final fit is guaranteed.
Cut six discs, then make two rings
For the proposed starter pair, cut four dark cover discs and two natural-tan center discs with the 40 mm cutter. Center the 20 mm cutter on each tan disc and remove its middle, leaving two rings. Save the small offcuts for adhesive or finish trials; they are not extra layers. Support the work on the mat or sacrificial board and follow the cutter maker’s flat press or supported striker/block instructions. Keep hands clear and never strike a thin cutting edge directly.
Prepare the color and bonding faces
If the covers need dye, test and apply it according to the label before assembly, keeping dye away from the tan edge. Let it dry as directed and check for rub-off. Leave glue faces clean and unfinished unless the adhesive maker specifies otherwise. Do not sand, drill, heat, or cut the magnets or damage their coating. Test the adhesive on both materials rather than assuming a leather contact cement also grips the magnet.
Dry-test both coins and mark polarity
Lay out two complete stacks: cover, ring with one magnet, cover. With every leather layer in place, bring the intended working faces together and verify that they attract instead of repel. Mark each magnet’s orientation on a removable layout note and keep each stack in order. Check flatness, ring fit, and the feel of sliding the covered coins past each other. If the attraction is weak or the fit is wrong, change the materials now—not after gluing.
Bond the first cover, ring, and magnet
Follow the adhesive’s surface preparation, application, open-time, and clamping directions. Bond a ring to the inner face of a cover, align the outer edges, and secure one magnet in the recess in its tested orientation using the compatible adhesive. Keep glue out of the finished edge and ensure the magnet cannot rattle. Keep the second magnet safely separated so it cannot snap into the work. Do not treat an enclosed but loose magnet as a completed assembly.
Close each coin and let it cure
Recheck polarity before bonding the remaining solid cover over each ring. Use protected flat cauls and only the pressure appropriate to the adhesive; do not crush a bulging stack into shape. Keep the two coins apart while curing so magnetic force cannot shift a bond. Allow the adhesive to reach the label’s full cure under its stated temperature and ventilation conditions. There is no universal overnight cure time for all adhesives and finishes.
Refine the edge, then inspect
After full cure, lightly even the leather perimeter if needed without thinning the covers, exposing a magnet, or cutting into the seam. Burnish only if suitable for the leather. Test a compatible finish on scrap; a light Tan-Kote treatment can retain a natural-tan center rather than turning it white. Follow all label cure and ventilation directions. Check every seam for lifting, every face for bulging, and each coin for rattles or visible damage. If a bond fails, stop and rebuild; do not simply hide it under finish.
Use gently and check before each session
Once all products have fully cured and the assembly passes inspection, test the pair gently over a clear work surface. Keep them away from children, pets, implants, and magnet-sensitive equipment. Inspect before every use and after a drop; stop immediately if an edge opens, a cover wears through, a magnet rattles, or anything cracks. Safely contain damaged coins and all pieces out of reach, then follow local disposal and magnet-supplier guidance.
Safety & Care
- Adult use only—not a child-safe toy. Swallowed powerful magnets can attract through internal tissue and cause fatal injury. Keep the entire project, including finished coins and scraps, away from children and pets.
- Suspected ingestion needs immediate emergency medical care even if the person has no symptoms. Do not wait for pain or other symptoms. For a pet, contact an emergency veterinarian immediately.
- Adhesive and encapsulation do not eliminate ingestion risk. Check seams and cover wear before each use. Stop using a damaged coin, contain all pieces out of reach, and dispose of them safely.
- Strong magnets can pinch skin and chip or shatter when they snap together. Wear eye protection, separate them carefully, and keep them away from pacemakers and other medical implants according to the magnet and device manufacturers’ guidance. Do not guess a safe separation distance.
- Cut on a supported mat or sacrificial board with fingers out of blade, punch, and press paths. Use a suitable flat press or the cutter manufacturer’s supported flat striker/block technique for thin ring dies. Never strike a sharp cutting edge or hammer kitchen cookie cutters.
- Follow adhesive, dye, and finish labels for ventilation, gloves, eye protection, flammability, cure conditions, and disposal. Keep uncured pieces inaccessible; a dry surface does not establish a full cure.
Troubleshooting
- The coins push apart
- One magnet is facing the wrong way. Resolve this during the full-stack dry test. If already sealed, do not cut toward a magnet or force it loose in your hand; set the failed piece aside safely and rebuild with the correct orientation.
- Attraction feels weak
- Check the complete dry stack, including both covers between the magnets. Excess leather thickness, a deep recess, or a poor magnet choice can weaken the result. Compare scrap stacks and supplier specifications before committing. A larger or stronger magnet also increases handling and ingestion hazards; no exact pull force has been tested here.
- A cover bulges or the magnet rattles
- The ring, hole, magnet thickness, or adhesive allowance does not match. Do not squeeze the defect flat or continue using it. Refit the stack on scrap and rebuild; the magnet should fit without stretching the ring or moving inside the finished coin.
- The edge opens or dark color stains the center
- Stop using any coin with an opening. Recheck adhesive compatibility, preparation, pressure, and full-cure conditions before rebuilding. For color bleed, test the cover dye and edge finish separately and preserve clean bonding faces; finish is not a repair for a weak seam.
Ideas to Try
- Keep the covers plain with a softly burnished edge for an understated dark-and-tan pair.
- Try an original geometric impression on scrap before assembly; keep brand names and copied cookie embossing off the leather.
- Compare natural-tan and lightly finished spacer scraps before choosing the pale-edge treatment.
Sources
Inspired by Ethan Carter Designs’ magnetic leather coin demonstration, shared by Kevin. The creator describes three leather circles per coin, a cutout in the middle layer for a magnet, and Tan-Kote on the natural center instead of dye. This is an original explanatory adaptation, not a transcript. The source does not establish exact cutter sizes, leather thickness, magnet specifications, or adhesive brands. The artwork is an illustration, not a photograph or a measured cutting template. Oreo is a visual reference only; this project is not affiliated with or licensed by the brand and does not reproduce its logo or embossing.
- Original demonstration — Ethan Carter Designs on Facebook
- Kevin’s literal shared reel link
- Creator crosspost — Ethan Carter Designs on YouTube
Updated 2026-11-15